
WordPress REST API Integration
This guide shows how to use OpenClaw Ultra to manage your WordPress site — publish posts, manage WooCommerce products, select categories, and fill hashtags — all through the WordPress REST API.
What You'll Need
- A self-hosted WordPress site (wordpress.org, not wordpress.com)
- The Basic Auth plugin installed on your WordPress site
- OpenClaw Ultra installed on your Windows desktop
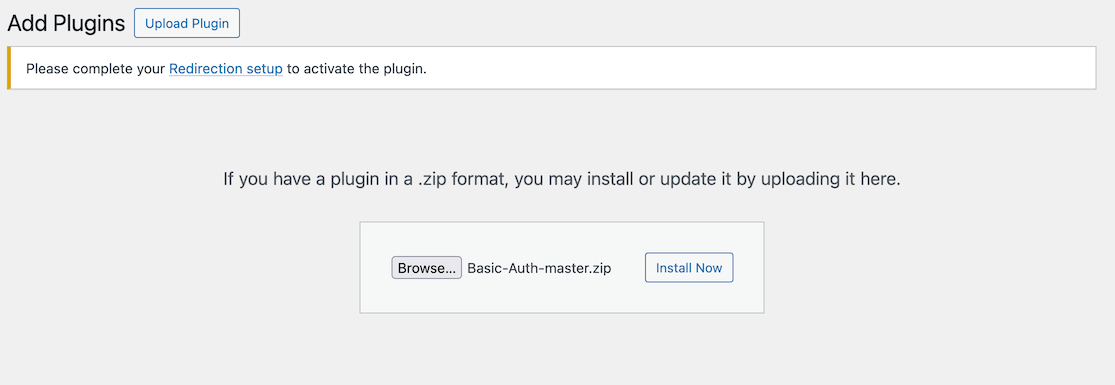
Step 1: Install the Basic Auth Plugin
WordPress REST API requires authentication. The easiest way is using the Basic Auth plugin.
- Download the plugin from: https://github.com/WP-API/Basic-Auth
- In your WordPress admin panel, go to Plugins → Add New Plugin → Upload Plugin
- Upload the downloaded
Basic-Auth-master.zipfile - Click Activate
Alternative Authentication
If your server supports OAuth or Application Passwords (WordPress 5.6+), you can use those instead. This guide uses Basic Auth for simplicity.
Step 2: Create a .env File for Credentials
Create a .env file in a secure location on your computer to store your WordPress site credentials.
Create a file named wordpress.env with the following content:
WP_SITE_URL=https://yoursite.com
WP_USERNAME=your-admin-username
WP_APPLICATION_PASSWORD=your-password
Keep Your .env File Safe
Never commit your .env file to version control or share it publicly. Add *.env to your .gitignore file.
Step 3: Configure OpenClaw Ultra to Read the .env File
In OpenClaw Ultra, you can use the File skill to read your .env file and load the credentials.
- Open OpenClaw Ultra
- In the chat, type:
Read the file at C:\path\to\wordpress.env and store each line as a variable.- OpenClaw Ultra will parse the
.envfile and make the values available for subsequent requests.
Step 4: Publish a WordPress Post via REST API
Now you can use OpenClaw Ultra to create and publish WordPress posts automatically.
Example prompt:
Using the WordPress REST API at {WP_SITE_URL}/wp-json/wp/v2/posts,
create a new post with:
- Title: "My First Automated Post"
- Content: "This post was created by OpenClaw Ultra via the WordPress REST API."
- Status: publish
- Categories: Technology, AI
- Hashtags: #WordPress #Automation #OpenClaw

Use Basic Auth with username {WP_USERNAME} and password {WP_APPLICATION_PASSWORD}.
OpenClaw Ultra will send a POST request to the WordPress REST API endpoint and publish your post.
API Endpoints Reference
| Action | Endpoint | Method |
|---|---|---|
| Create post | /wp-json/wp/v2/posts | POST |
| Update post | /wp-json/wp/v2/posts/{id} | PUT |
| Get posts | /wp-json/wp/v2/posts | GET |
| Delete post | /wp-json/wp/v2/posts/{id} | DELETE |
Step 5: Manage WooCommerce Products
If you have WooCommerce installed, you can also manage products via the WooCommerce REST API.
Example prompt:
Using the WooCommerce REST API at {WP_SITE_URL}/wp-json/wc/v3/products,
create a new product with:
- Name: "AI Automation Course"
- Type: simple
- Regular price: 49.99
- Description: "Learn how to automate your workflows with AI."
- Categories: Courses, Digital Products
- Stock: 100

Use Basic Auth with username {WP_USERNAME} and password {WP_APPLICATION_PASSWORD}.
WooCommerce API Endpoints
| Action | Endpoint | Method |
|---|---|---|
| Create product | /wp-json/wc/v3/products | POST |
| Get products | /wp-json/wc/v3/products | GET |
| Update product | /wp-json/wc/v3/products/{id} | PUT |
| Delete product | /wp-json/wc/v3/products/{id} | DELETE |
| Get orders | /wp-json/wc/v3/orders | GET |
| Create category | /wp-json/wc/v3/products/categories | POST |
Step 6: Select Categories
Before assigning categories to your posts, you may need to find existing category IDs.
Prompt to get categories:
Using the WordPress REST API at {WP_SITE_URL}/wp-json/wp/v2/categories,
list all categories on the site.

Use Basic Auth with username {WP_USERNAME} and password {WP_APPLICATION_PASSWORD}.
To create a new category:
Create a new category called "AI Tutorials" via:
POST {WP_SITE_URL}/wp-json/wp/v2/categories
with name "AI Tutorials" and slug "ai-tutorials".

Use Basic Auth with username {WP_USERNAME} and password {WP_APPLICATION_PASSWORD}.
Step 7: Fill Hashtags Automatically
You can ask OpenClaw Ultra to generate and add relevant hashtags to your posts.
Example prompt:
For the post titled "My First Automated Post" on {WP_SITE_URL},
generate 5 relevant hashtags based on its content and add them to the post.

Use the WordPress REST API to update the post's tags or custom fields.
Use Basic Auth with username {WP_USERNAME} and password {WP_APPLICATION_PASSWORD}.
Troubleshooting
401 Unauthorized Error
- Make sure the Basic Auth plugin is activated
- Verify your username and password are correct
- Check that your WordPress site uses HTTPS
404 Endpoint Not Found
- Ensure pretty permalinks are enabled in WordPress Settings → Permalinks
- Verify the REST API is accessible:
{WP_SITE_URL}/wp-json/
403 Forbidden / Cloudflare Blocked
If you get a 403 error, Cloudflare may be blocking the API request. This happens because WordPress REST API requests from automated tools can be flagged as suspicious.
Solution — Set a custom User-Agent header:
When making requests via OpenClaw Ultra, explicitly set a common User-Agent string so Cloudflare treats the request as coming from a real browser. For example:
User-Agent: Mozilla/5.0 (Windows NT 10.0; Win64; x64) AppleWebKit/537.36 (KHTML, like Gecko) Chrome/120.0.0.0 Safari/537.36In your OpenClaw Ultra prompt, include the User-Agent header like this:
POST {WP_SITE_URL}/wp-json/wp/v2/posts
Headers:
  User-Agent: Mozilla/5.0 (Windows NT 10.0; Win64; x64) AppleWebKit/537.36 (KHTML, like Gecko) Chrome/120.0.0.0 Safari/537.36
  Authorization: Basic {base64-encoded-credentials}

Body:
  title: "My Post"
  content: "Post content"
  status: publish
WooCommerce Endpoint Not Available
- Make sure WooCommerce plugin is installed and activated
- WooCommerce API requires WooCommerce 3.0+
Next Steps
- Explore other WordPress REST API endpoints
- Automate content publishing schedules
- Build a complete content workflow with OpenClaw Ultra
Continue with other integration guides to expand your automation capabilities.